

If you work in professional audio, you know how crucial seamless digital routing is. And when it comes to managing high-channel count audio over IP, Dante is the industry standard. But here’s the catch—without the right setup, even the most advanced technology can turn into a troubleshooting nightmare. That’s where DADman software steps in.
Think of DADman as the control center for your Dante system, allowing you to route, monitor, and optimize your entire audio workflow with precision. Whether you’re configuring a high-end studio, a live sound rig, or a broadcast facility, knowing how to properly set up Dante with DADman can save you hours of frustration—and even prevent costly mistakes.
In this guide, we’ll walk you through everything you need to get started: from network configuration and device detection to creating reliable signal flows that just work. No guesswork. No confusion. Just a clear, step-by-step process to help you harness the full power of Dante and DADman with confidence.
Let’s dive in!
Understanding Dante and DADman
What is Dante?
Dante (Digital Audio Network Through Ethernet) is a protocol developed by Audinate that enables uncompressed, multi-channel digital audio transmission over standard IP networks. Unlike traditional analog setups, Dante eliminates the need for heavy cabling, ensuring seamless audio integration across devices.
What is DADman?
DADman is the proprietary software designed to control and configure DAD (Digital Audio Denmark) interfaces, such as the AX32 and DX32. It also serves as an essential tool for managing Dante-based routing, latency settings, and monitoring setups.
Setting Up Dante with DADman: Step-by-Step Guide
1. Network Configuration for Dante
To ensure smooth communication between devices, follow these network setup best practices:
- Use a Gigabit Ethernet Switch: Dante requires a robust network infrastructure. A managed switch with QoS (Quality of Service) settings is recommended.
- Enable IGMP Snooping: Prevent unnecessary multicast traffic from congesting the network.
- Assign Static IPs (Optional): While Dante automatically assigns IPs via DHCP, manually assigning static IPs can improve stability.
2. Installing and Configuring DADman
- Download and Install: Ensure you have the latest version of DADman from the official Digital Audio Denmark website.
- Connect Your DAD Interface: Use Ethernet to connect your AX32 or DX32 to your Dante network.
- Launch DADman: Open the software and verify that your devices are detected in the interface.
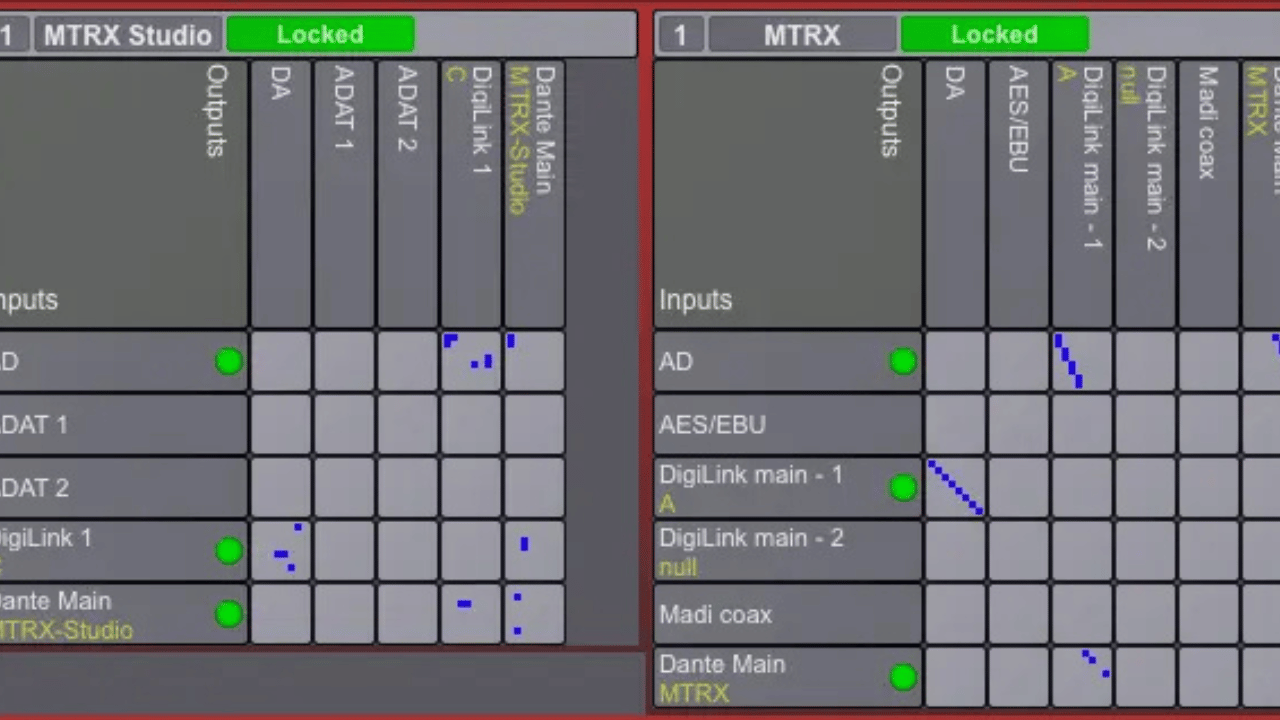
3. Assigning and Routing Audio Channels
- Identify Input and Output Channels: Within DADman, navigate to the “Matrix” section to route audio from Dante devices to your system.
- Configure Sample Rates: Ensure all devices in your Dante network share the same sample rate to avoid clocking issues.
- Set Up Latency Compensation: Adjust buffer settings based on network performance. Lower values improve real-time response but may require a more stable network.
4. Monitoring and Troubleshooting
- Use Dante Controller: This free software allows you to inspect signal paths, latency, and clock synchronization.
- Check Device Status: Within DADman, monitor input/output levels to ensure proper signal routing.
- Resolve Common Issues:
- No Audio? Check network connections and verify correct channel routing.
- Latency Spikes? Optimize network bandwidth and avoid using Wi-Fi for Dante setups.
Advanced Features of DADman for Pro Audio Users
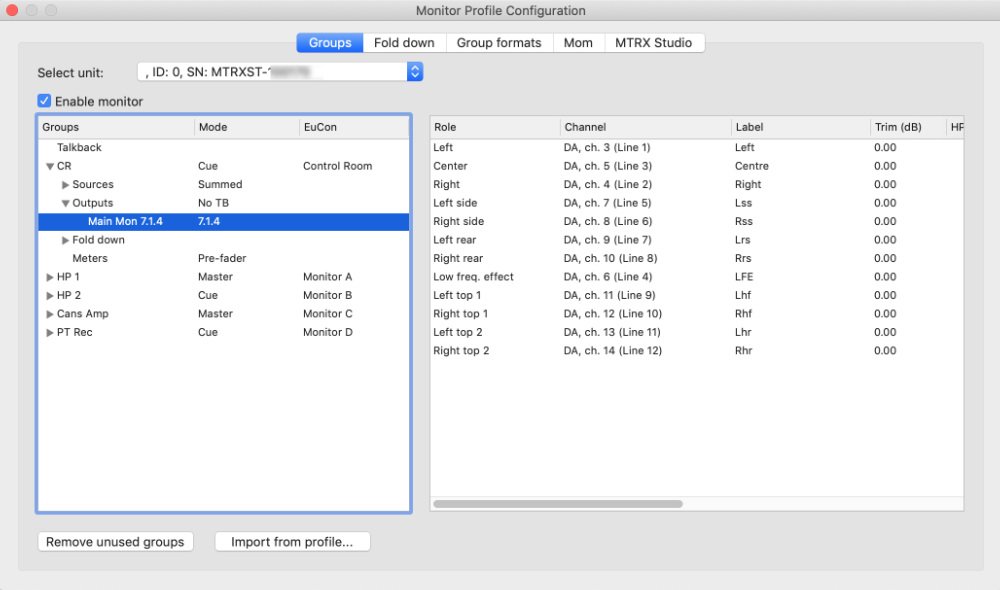
Customizing Monitor Profiles
DADman allows users to create customized monitoring profiles, perfect for studios handling multiple mixes. Set up different speaker configurations, headphone outputs, and input sources tailored to specific workflows.
Integrating External Hardware
For hybrid studios, DADman supports integration with analog gear, enabling users to blend digital efficiency with classic analog warmth seamlessly.
Automating Routing for Live Sound
Live sound engineers can benefit from DADman’s ability to automate routing changes between sets, reducing downtime and improving efficiency.
Final Thoughts
By following these steps, you can achieve a rock-solid Dante setup that delivers pristine, low-latency audio transmission. Whether you’re working in a studio, live venue, or broadcast environment, mastering DADman and Dante will enhance your workflow and elevate audio performance.
Looking to expand your Dante network? Consider investing in redundant networking setups and high-quality audio interfaces to future-proof your system. Now, take your knowledge and build an audio network that works flawlessly—every time!