Duplicate files somehow find a way to clog up storage space and create a lot of confusion. The reason behind it is that you will find it hard to identify the right files. Plus, your PC’s storage is reduced significantly. Hence, at some point, you have to take the crucial step of cleaning duplicate files on your computer. You’ll have to go through the effort of checking a variety of file formats – audio files, documents, photos, videos, software files, and more.
We understand that identifying duplicated files can be a nightmare. We have, therefore, come up with some of the best ways to remove duplicate files.
How To Eliminate Duplicate Files and Folders From Your Computer?
Method No. 1 – Duplicate File Finder
You can start by using a dedicated duplicate file remover for your Windows PC. Duplicate Files Fixer from Systweak, for instance, is often hailed as one of the best duplicate file finders that you can use on your Windows PC.
First, let’s have a look at how easy it is to identify and remove duplicates using Duplicate Files Fixer –
Step 1:
Download Duplicate Files Fixer, and run the installation file.
Step 2:
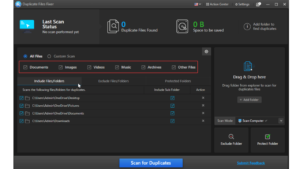
You can either choose to scan all files on your computer to find duplicates, or select particular files.
Step 3:
Add files and folders that you want to scan for duplicate files.
Step 4:
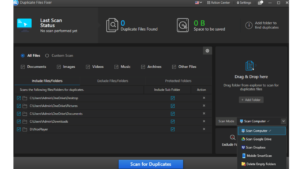
You can also click on the Scan Mode from the right-hand side, and remove duplicate files from Google Drive, Dropbox, choose EML scan mode, etc. as shown in the screenshot.
Step 5:
Click on the Scan for Duplicates button to initiate the scan process. Wait for the scan to complete.
Step 6:
Once the scanning process is complete, all duplicate files will be arranged. Here’s how you can go about selecting duplicate files quickly.
Once all the duplicate files are enlisted, click on the Automark option from the top. This way all duplicate files will be automatically marked in each group.
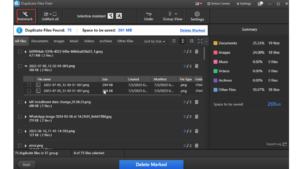
Duplicate Files Fixer also lets you change automarking priorities according to your preferences.
Step 7:
You can click on each of the file types, go through the selection you have made, and if needed you can also unmark files.
Step 8:
Click on Delete Marked to delete the selected duplicate files.
Why Choose Duplicate Files Fixer?
– Scan all kinds of files.
– Exclude folders or files that you don’t want to include in the scan.
– Preview files before deleting them.
– Delete empty folders.
– Include/exclude specific file types.
Method No. 2 – File Explorer (Via Indexing)
Using a duplicate file finder tool is the most preferred (and even safer) way to get rid of duplicate files. However, if you don’t want to use software or wish to learn about a method to manually delete duplicate files, you can use the File Explorer of your Windows PC. Here’s how –
Step 1:
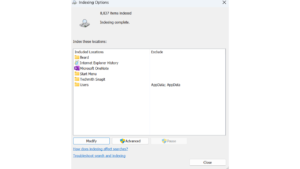
In the Windows search bar, type Indexing, and click on Open.
Step 2:
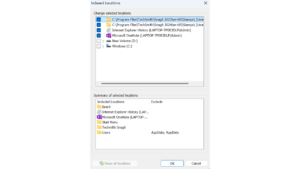
Click on the Modify button.
Step 3:
Click on Show all locations.
Step 4:
Check all the boxes, and click on OK.
Step 5:
Open the File Explorer on your computer.
Step 6:
Go to This PC>Local Disk (C:)>Users to access your user profile.
Step 7:
Adjust the view layout of the file explorer so that you can see the files. Click on Sort dropdown and select Name, and Ascending.
Step 8:
In the search bar, type the name of the exact extension in which you want to find duplicate files. You may also want to analyze the file name, date modified, and file size.
Step 9:
Once you have identified duplicates, click on the Delete option.
Method No. 3 – Window PowerShell
In this method, you can eliminate duplicate files from your computer, using Windows PowerShell.
Step 1:
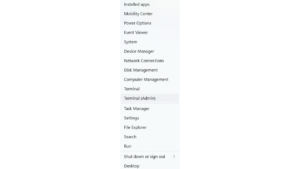
Press Windows + X.
Step 2:
When the context menu opens, open Terminal (Admin).
Step 3:
In the Windows Powershell window, type set-location –path C:\
Step 4:
Copy and paste the below command. In place of Search folder, and Location folder, enter the path of the actual folder.
ls “(search folder)” -recurse | get-filehash | group -property hash | where { $_.count -gt 1 } | % { $_.group } | Out-File -FilePath “(location folder)
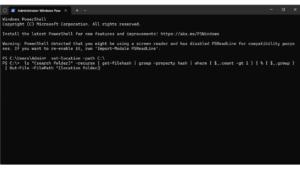
The above process will take some time to complete depending on the number of files. Once the process is complete, open the .txt file to see the location of duplicate files.
Step 5:
You can also paste the below command to delete duplicate files automatically. Again, replace the Search folder with actual folder path –
ls “(search folder)” -recurse | get-filehash | group -property hash | where { $_.count -gt 1 } | % { $_.group | select -skip 1 } | del
Method No. 4 – Using Command Prompt
Run the command mentioned in the post on a small folder in order to get more precise results. Also, the commands below will more effectively work on files that are similar.
Step 1:
In the Windows search bar, type cmd, and from the right-hand side, click on Run as administrator.
Step 2:
When the Command Prompt opens, type cd.
Step 3:
Copy-paste the following commands –
for /f “tokens=*” %a in (‘dir /b /s /a-d ^| sort’) do @(
if not defined prevfile (
set “prevfile=%a”
) else if exist “%a” (
fc /b “%prevfile%” “%a” >nul
if not errorlevel 1 (
echo Deleting: “%a”
del “%a” /f /q
) else (
set “prevfile=%a”
)
)
)
Method No. 5 – Disable Cloud Sync Settings If Required
One of the reasons why duplicate files may appear is when you have enabled automatic file syncing during backups. Cloud backup platforms like OneDrive, GoogleDrive, Dropbox, etc can create duplicate files when settings are not configured properly.
So, if you encounter a situation where your storage is clogged up with a lot of duplicate files, you can disable automatic sync or a feature like this on the cloud backup platform you are using. You can enable it once you have freed up your Windows computer from duplicate files.
To get an in-depth overview on all of the above steps, you can check out this post.
Wrapping Up
It is important that you keep a check on duplicate files on your computer. They don’t just eat away precious storage space, but also impact the system’s performance and create hindrances in managing files. If you found value in this post, do let us know in the comments section below.


