Mapping a network drive might seem like a mundane task, but here’s a surprising fact: according to IT surveys, nearly 30% of small business downtime stems from mismanaged or inaccessible network resources. That’s time you can’t afford to lose. A seamless workflow starts with organized network access—and that’s where remapping a network drive becomes essential.
Imagine this: your team is ready to hit the ground running, but files are scattered across servers, and connections are unreliable. Frustrating, right? Remapping fixes that. It’s not just about accessing shared files; it’s about creating a streamlined, efficient digital workspace.
In this guide, I’ll show you exactly how to remap a network drive, step by step. Whether you’re troubleshooting connection issues or setting up a fresh mapping to a shared folder, you’ll leave with clear, actionable strategies to get the job done—fast and headache-free. Let’s dive in!
Why Remapping a Network Drive is Important
Network drives are a cornerstone of modern business operations. They allow for centralized file storage, collaboration, and easy access to critical data. However, when connections break or mappings become outdated, it can lead to delays, errors, and frustration. By remapping your network drive, you ensure that your systems remain efficient and your team stays productive.
Benefits of Remapping a Network Drive
- Improved Productivity: Employees save time by accessing shared resources directly.
- Centralized Access: A mapped drive centralizes file storage, reducing duplication.
- Streamlined Troubleshooting: It’s easier to diagnose and resolve issues with proper mapping.
- Enhanced Security: By remapping drives, you can enforce access control measures.
Step-by-Step Guide to Remap a Network Drive

Step 1: Check the Current Drive Mapping
Before making changes, it’s essential to know what’s already in place. Follow these steps:
- Open File Explorer (Windows) or Finder (Mac).
- Navigate to the “This PC” section.
- Review the list of mapped drives and note the ones causing issues.
Step 2: Gather Connection Details
You’ll need the following information:
- Network Path: This is usually in the format
\\ServerName\SharedFolder. - Username and Password: Ensure you have valid credentials if the drive requires authentication.
- Permissions: Verify that you have access rights to the shared folder.
Step 3: Disconnect the Old Mapping
To avoid conflicts, remove outdated or incorrect mappings:
- Right-click the problematic drive in File Explorer.
- Select “Disconnect.”
Step 4: Map the Drive
Here’s how to create a fresh mapping:
- Open File Explorer and click on “This PC.”
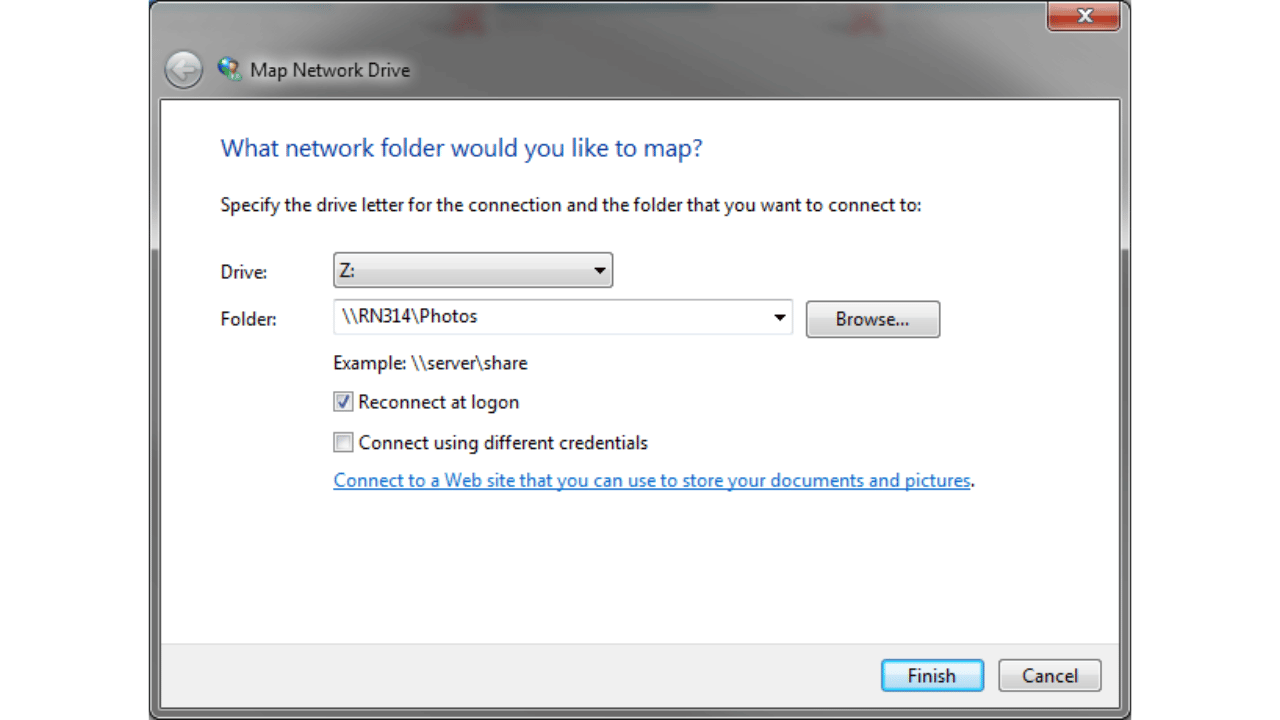
- Select Map Network Drive from the top menu.
- Choose a drive letter (e.g., Z:).
- Enter the network path in the “Folder” field.
- Check “Reconnect at sign-in” if you want the mapping to persist.
- Enter your username and password if prompted.
Step 5: Test the Connection
After mapping, ensure the connection works:
- Navigate to the new drive in File Explorer.
- Open a file or folder to verify access.
Troubleshooting Common Issues
Even with careful setup, problems can occur. Here’s how to address common issues:
Issue 1:
Network Path Not Found
- Solution: Verify the network path and server availability. Use the
pingcommand to check connectivity.
Issue 2:
Access Denied
- Solution: Confirm that your credentials and permissions are correct. Contact your IT administrator if needed.
Issue 3:
Drive Not Reconnecting After Restart
- Solution: Ensure “Reconnect at sign-in” is checked. If the issue persists, use Group Policy settings to enforce the mapping.
Advanced Tips for Managing Network Drives
Automate Drive Mapping with Scripts
For IT administrators managing multiple users, scripting can save time. Here’s an example of a PowerShell script:
New-PSDrive -Name "Z" -PSProvider FileSystem -Root "\\ServerName\SharedFolder" -PersistUse Group Policy for Enterprise Environments
Group Policy allows you to enforce drive mappings across an organization. Configure settings under User Configuration > Preferences > Windows Settings > Drive Maps.
Monitor and Audit Drive Usage
Use tools like Windows Event Viewer or third-party software to track access patterns and identify potential issues.
Best Practices for Network Drive Management
- Document Network Paths: Maintain an updated list of shared folder paths and permissions.
- Regularly Review Access: Periodically audit who has access to which drives.
- Train Your Team: Educate employees on using and troubleshooting network drives.
- Backup Critical Data: Ensure that important files on network drives are backed up regularly.
Frequently Asked Questions
Q1: Can I map multiple drives simultaneously?
Yes, you can map several drives by repeating the process for each network path. Ensure each drive has a unique letter.
Q2: How do I map a network drive on a Mac?
- Open Finder.
- Press
Command + Kto open the “Connect to Server” dialog. - Enter the network path and click “Connect.”
Q3: What should I do if my mapped drive disconnects frequently?
- Check for network instability.
- Ensure the server hosting the shared folder is online.
- Update your system’s network adapter drivers.
Conclusion
Mapping a network drive is a small but powerful step toward optimizing your digital workspace. By following the steps in this guide and implementing the best practices, you can ensure smooth and reliable access to shared resources. Whether you’re a tech-savvy individual or managing IT for a team, these strategies will help you stay productive and connected. Now it’s your turn—go remap that drive and take control of your workflow!


